


Yeah! I have learned Java, what's the next step? Let's make an application! Oops, I have no idea how to do that!
Now, one question pops into my mind, how can I make a real-life application with Java?
I choose to use Spring framework.
What is Spring and why choose spring?
Spring is an open-source application framework that is used for Java application development. It is one of the most popular frameworks in the world because of its efficiency, convenience, and safety. With the long-term development, Spring now has a complete ecosystem, we can use Spring framework to develop various projects.
Spring Framework
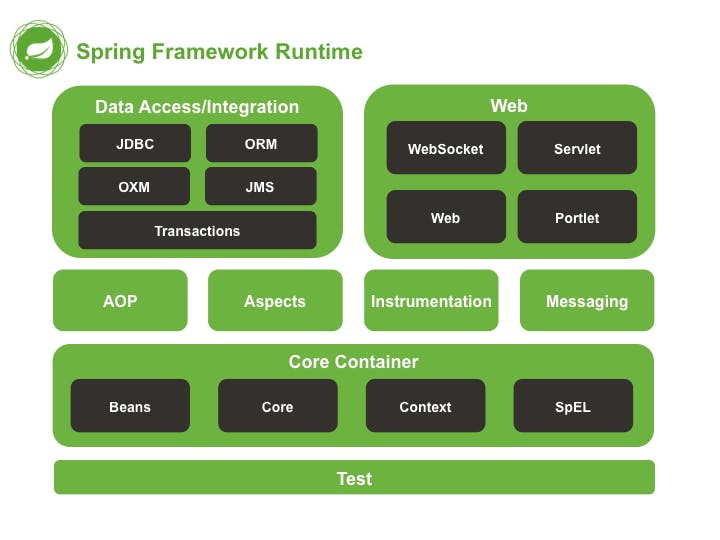 Here's the concept map of Spring, the first thing we need to learn about Spring is its Core Container.
Core Container
Before learning Core Container, we need to understand what is IoC.
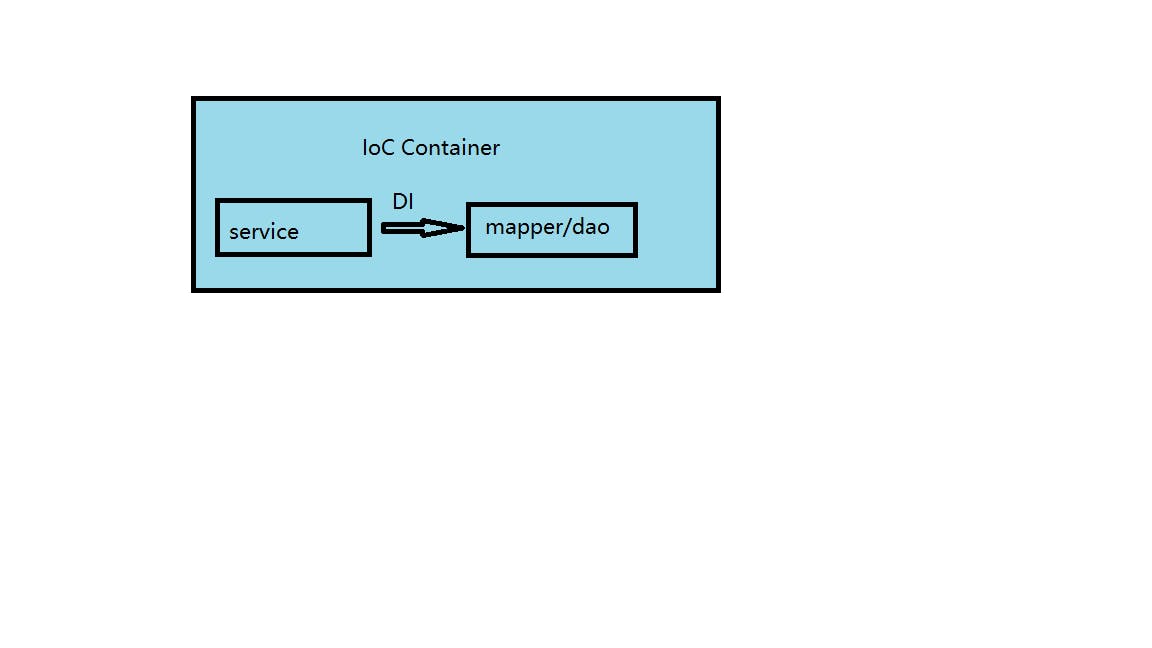
IoC means inversion of control, it is the main idea of Core Container. We pass the control of creating objects to the outside framework, instead of creating objects by ourselves, now the framework will create objects for us. The purpose of using IoC is to decouple our code.
To implement this concept, Spring offered a container, which is called IoC container. Objects we need in a project will be provided by this container. The objects that are created or managed by IoC container are called Bean.
To manage the relationships between the Beans in IoC container, Spring used a new technique called DI (Dependency Injection).
 The process to create Bean in Spring using IoC concept:
Step 1: Create a project and add Spring framework to your dependency:
    <dependency>
      <groupId>org.springframework</groupId>
      <artifactId>spring-context</artifactId>
      <version>5.3.20</version>
    </dependency>
Step 2: Create your service class:
public class exampleService {

    public void run() {
        System.out.println("Service is running ...");
    }
}
Step 3: Create an applicationContext.xml file so Spring could create the Bean:
<?xml version="1.0" encoding="UTF-8"?>
<beans xmlns="http://www.springframework.org/schema/beans"
       xmlns:xsi="http://www.w3.org/2001/XMLSchema-instance"
       xsi:schemaLocation="http://www.springframework.org/schema/beans http://www.springframework.org/schema/beans/spring-beans.xsd">


    <bean id="exampleService" class="com.example.Service.impl.exampleService"/>

</beans>
Step 4: Run a test:
public class test {
    public static void main(String[] args) {
        ApplicationContext context= new ClassPathXmlApplicationContext("applicationContext.xml");
        exampleService exampleService = (exampleService)context.getBean("exampleService");
        exampleService.run();
    }
}
if we run this program, we get:
Service is running ...
Great, we successfully create a Bean for exampleService object in IoC container. Now, what if we have two objects and we want to set up the relationships between those two objects, how should we do that?
Step 1: Create a second class exampleDao:
public class exampleDao {
    public void run(){
        System.out.println("Dao is running ...");
    }
}
Step 2: Add the new Bean information in the applicationContext.xml file and create the relationship between those two Beans:
<?xml version="1.0" encoding="UTF-8"?>
<beans xmlns="http://www.springframework.org/schema/beans"
       xmlns:xsi="http://www.w3.org/2001/XMLSchema-instance"
       xsi:schemaLocation="http://www.springframework.org/schema/beans http://www.springframework.org/schema/beans/spring-beans.xsd">

    <bean id="exampleDao" class="com.example.dao.exampleDao"/>
    <bean id="exampleService" class="com.example.Service.exampleService">
        <property name="exampleDao" ref="exampleDao"/>
    </bean>

</beans>
Step 3: Call exampleDao Object in exampleService class:
public class exampleService {
    private exampleDao exampleDao;

    public void run() {
        System.out.println("Service running ...");
        exampleDao.run();
    }

    public void setExampleDao(exampleDao exampleDao) {
        this.exampleDao = exampleDao;
    }
}
Step 4: Run the test:
public class test {
    public static void main(String[] args) {
        ApplicationContext context= new ClassPathXmlApplicationContext("applicationContext.xml");
        exampleService exampleService = (exampleService)context.getBean("exampleService");
        exampleService.run();
    }
}
We get the result:
Service running ...
Dao is running ...
Bean Configuration
We can give the exampleService Bean a name and we can call its name when we need to use it.
    <bean id="exampleDao" class="com.example.dao.exampleDao"/>
    <bean id="exampleService" name = "service, service2" class="com.example.Service.exampleService">
        <property name="exampleDao" ref="exampleDao"/>
    </bean>
public class test {
    public static void main(String[] args) {
        ApplicationContext context= new ClassPathXmlApplicationContext("applicationContext.xml");
        exampleService exampleService = (exampleService)context.getBean("service");
        exampleService.run();

    }
}
We can still get the result:
Service running ...
Dao is running ...
Bean Scope
When we create a Bean, its default scope is a singleton:
public class test {
    public static void main(String[] args) {
        ApplicationContext context= new ClassPathXmlApplicationContext("applicationContext.xml");
        exampleService exampleService = (exampleService)context.getBean("service");
        System.out.println(exampleService);
        System.out.println(exampleService);
    }
}
The system will print:
com.example.Service.exampleService@d706f19
com.example.Service.exampleService@d706f19
We can change it in the Bean configuration file:
    <bean id="exampleDao" class="com.example.dao.exampleDao"/>
    <bean id="exampleService" name = "service service2" class="com.example.Service.exampleService" scope="prototype">
        <property name="exampleDao" ref="exampleDao"/>
    </bean>
Let's run the test again:
public class test {
    public static void main(String[] args) {
        ApplicationContext context= new ClassPathXmlApplicationContext("applicationContext.xml");
        exampleService exampleService1 = (exampleService)context.getBean("service");
        exampleService exampleService2 = (exampleService)context.getBean("service");
        System.out.println(exampleService1);
        System.out.println(exampleService2);
    }
}
The result would be:
com.example.Service.exampleService@d706f19
com.example.Service.exampleService@30b7c004
Why beans' default scope is a singleton in Spring?
Because we will use the same bean multiple times.
What types of beans should we use as a singleton?
Mapper, Controller, Service, tool class.
Instance of Bean
Spring uses the no-argument constructor to instantiate Bean. We must provide a no-argument constructor in the Bean class, otherwise, an exception will be thrown out.
Spring can also use a factory class to instantiate, for example:
We create a new factory class:
public class DaoFactory {
    public static exampleDao getexampleDao (){
        return  new exampleDao();
    }
}
Then we add this factory class to the applicationcontext file.
<bean id="exampleDao" class="com.example.factory.DaoFactory" factory-method="getexampleDao"/>
Run the test:
public class test {
    public static void main(String[] args) {
        ApplicationContext context= new ClassPathXmlApplicationContext("applicationContext.xml");
        exampleDao exampleDao = (exampleDao)context.getBean("exampleDao");
        exampleDao.run();
    }
}
The result is:
Dao is running ...
To make this method easier, Spring provided an interface for factory class. The factory class we created needs to implement this interface:
public class DaoFactory implements FactoryBean<exampleDao> {

    @Override
    public exampleDao getObject() throws Exception {
        return new exampleDao();
    }

    @Override
    public Class<?> getObjectType() {
        return exampleDao.class;
    }
}
Create a bean in applicationContext file:
<bean id="exampleDao" class="com.example.factory.DaoFactory"/>
Run the test:
public class test {
    public static void main(String[] args) {
        ApplicationContext context= new ClassPathXmlApplicationContext("applicationContext.xml");
        exampleDao exampleDao = (exampleDao)context.getBean("exampleDao");
        exampleDao.run();
    }
}
We get the result:
Dao is running ...
Bean life cycle
Something when we use a bean, we need to do some pre-work and after-work for this bean. How to do that? For example, we create a new exampleDao class:
public class exampleDao {
    public void run(){
        System.out.println("Dao is running ...");
    }

    public void init(){
        System.out.println("init...");
    }

    public void destroy() {
        System.out.println("destroy...");
    }
}
To use the init( ) method and destroy ( ) method, we need to update applicationContext file:
<bean id="exampleDao" class="com.example.dao.exampleDao" init-method="init" destroy-method="destroy"/>
To see, both int() method and destroy () method running, we need to update our test class:
public class test {
    public static void main(String[] args) {
        ClassPathXmlApplicationContext context= new ClassPathXmlApplicationContext("applicationContext.xml");
        exampleDao exampleDao = (exampleDao)context.getBean("exampleDao");
        exampleDao.run();
        context.close();
    }
}
Run the test and our result is:
init...
Dao is running ...
destroy...
The destroy( ) method will be called right before container gets closed.
Here the close() method is a brute force approach, the better way is using Hook:
public class test {
    public static void main(String[] args) {
        ClassPathXmlApplicationContext context= new ClassPathXmlApplicationContext("applicationContext.xml");
        context.registerShutdownHook();
        exampleDao exampleDao = (exampleDao)context.getBean("exampleDao");
        exampleDao.run();
//        context.close();
    }
}
Spring provides an interface to better use init() and destroy() method, for example, we can implement the interface in the service class
public class exampleService implements InitializingBean, DisposableBean {
    private exampleDao exampleDao;

    public void run() {
        System.out.println("Service running ...");
        exampleDao.run();
    }

    public void setExampleDao(exampleDao exampleDao) {
        this.exampleDao = exampleDao;
    }

    @Override
    public void destroy() throws Exception {
        System.out.println("service destroy...");
    }

    @Override
    public void afterPropertiesSet() throws Exception {
        System.out.println("service init...");
    }
}
Our applicationContext file looks like this:
    <bean id="exampleDao" class="com.example.dao.exampleDao" init-method="init" destroy-method="destroy"/>
    <bean id="exampleService" name = "service service2" class="com.example.Service.exampleService" >
        <property name="exampleDao" ref="exampleDao"/>
    </bean>
We can run the test and the result is :
public class test {
    public static void main(String[] args) {
        ClassPathXmlApplicationContext context= new ClassPathXmlApplicationContext("applicationContext.xml");

        exampleService exampleService = (exampleService)context.getBean("service");
        exampleService.run();
        context.close();
    }
}
Dao init...
service init...
Service running ...
Dao is running ...
service destroy...
Dao destroy...
Spring annotation
Starting from Spring 2.0, Spring provides all kinds of annotations to make the job easier for developers.
In previous examples, we set up our beans in applicationContext file, with the label. We can now use "Component" annotation. For example:
@Component
public class exampleDao {
    public void run(){
        System.out.println("Dao is running ...");
    }
}
Our applicationContext file will be
<?xml version="1.0" encoding="UTF-8"?>
<beans xmlns="http://www.springframework.org/schema/beans"
       xmlns:xsi="http://www.w3.org/2001/XMLSchema-instance"
       xmlns:context="http://www.springframework.org/schema/context"
       xsi:schemaLocation="http://www.springframework.org/schema/beans http://www.springframework.org/schema/beans/spring-beans.xsd
                            http://www.springframework.org/schema/context http://www.springframework.org/schema/context/spring-context.xsd">

    <context:component-scan base-package="com.example.dao"/>
</beans>
Let's run the test
public class test {
    public static void main(String[] args) {
        ApplicationContext context= new ClassPathXmlApplicationContext("applicationContext.xml");
        exampleDao exampleDao = context.getBean(exampleDao.class);
        exampleDao.run();
    }
}
The result would be:
Dao is running ...
Notice: to use "Component" annotation, we have to open a new namespace in applicationContext file.
As time passed, "Component" was subdivided into three different annotations. We can now use "Service" annotation for service level, we can use "Controller" annotation for controller level, and we can use "Repository" for data level.
To make development easier, Spring 3.0 abandoned the applicationContext file. Instead, we now create a SpringConfig class.
@Configuration
@ComponentScan("com.example")
public class SpringConfig {
}
exampleDao class and exampleService class are still the same.
@Component
public class exampleDao {
    public void run(){
        System.out.println("Dao is running ...");
    }
}
@Component
public class exampleService {
    @Autowired
    private exampleDao exampleDao;


    public void setExampleDao(exampleDao exampleDao) {
        this.exampleDao = exampleDao;
    }
    public void run() {
        System.out.println("Service running ...");
        exampleDao.run();
    }
}
Then we run the test in a new test class:
public class test {
    public static void main(String[] args) {
        ApplicationContext context= new AnnotationConfigApplicationContext(SpringConfig.class);
        exampleDao exampleDao = context.getBean(exampleDao.class);
        exampleService exampleService = context.getBean(exampleService.class);
        exampleService.run();
    }
}
The result is:
Service running ...
Dao is running ...
With annotation, we can implement almost all functions. For example, we can use "Scope()" to define bean scope, we can use "PostConstruct" or "PreDestroy" to define init() method or destroy() method.
We can use "Autowired" annotation to set up the dependency injection between beans, for example:
@Service
public class exampleService {
    @Autowired
    private exampleDao exampleDao;

    public void run() {
        System.out.println("Service running ...");
        exampleDao.run();
    }
}
You may notice that we deleted the set method for exampleDao, Spring uses reflection to get access to the exampleDao class.
MyBatis
MyBatis is a Java persistence framework that couples objects with stored procedures or SQL statements using an XML description or annotation. We use myBatis to retrieve data from our database such as MySQL.
Spring integrates myBatis
Apache Druid is a column-oriented, open-source, distributed data store used to query and analyze issues in large datasets in real-time.
When we use a complex database, frequently establishing and closing connections between system and data source will greatly reduce the performance of the system. Hence we need to use the same connections multiple times. By establishing a database connection pool and a set of connection usage management strategies, a database connection can be reused efficiently and safely.
<dependency>
    <groupId>com.alibaba</groupId>
    <artifactId>druid</artifactId>
    <version>1.2.10</version>
</dependency>
MyBatis dependency, and MyBatis to Spring standard dependency
<dependency>
    <groupId>org.mybatis</groupId>
    <artifactId>mybatis</artifactId>
    <version>3.5.10</version>
</dependency>
<dependency>
    <groupId>org.mybatis</groupId>
    <artifactId>mybatis-spring</artifactId>
    <version>2.0.7</version>
</dependency>
Also, we need a database system to provide and store data, here we use MySql
<dependency>
    <groupId>mysql</groupId>
    <artifactId>mysql-connector-java</artifactId>
    <version>8.0.29</version>
</dependency>
For Spring to control data, we need to import the related dependency
<dependency>
    <groupId>org.springframework</groupId>
    <artifactId>spring-jdbc</artifactId>
    <version>5.3.20</version>
</dependency>
JUnit
JUnit is a unit testing framework for Java. We use it to do unit tests for our code. It helps to improve the code quality and increase development speed.
JUnit dependency
    <dependency>
      <groupId>junit</groupId>
      <artifactId>junit</artifactId>
      <version>4.13.2</version>
    </dependency>
Then we create a test class for JUnit
@RunWith(SpringJUnit4ClassRunner.class)
@ContextConfiguration(classes = SpringConfig.class)
public class ServiceTest {

    @Autowired
    private exampleDao exampleDao;
    @Test
    public void Test(){
        exampleDao.run();
    }
}
Run the test and we can get
Dao is running ...